Storyboard에서 Exit할 수 있는 Unwind segue를 만든다.
- 버튼에서 Exit로 Ctrl-Drag에서 만들 수도 있고
- 해당 View Controller의 아이콘에서 Exit로 Ctrl-Drag해서 Unwind segue를 만든다.
왼쪽 리스트에서 Unwind Segue from XXViewController를 선택하고, 오른쪽 Attribute Inspector에서 Identifier를 설정할 수 있다.
그러면, 코드상에서 performSegueWithIdentifier로 호출할 수 있다.
[참고: stackoverflow - How to perform Unwind segue programmatically?]
2015/01/20
2014/12/26
[iOS] 원형의 그라디언트 이미지를 그려봅시다. (Rendering a radial gradient)
Radial Gradient
원형으로 배경을 은은하게 채워야하는 경우에, 아래와 같이 그림이 필요합니다.이미지를 만들어서 넣으면 좋겠지만, Core Graphics를 사용해서 그릴 수 있습니다.
 |
| 만들 이미지 |
- (void)drawRadialGradient:(UIColor *)startColor
                  endColor:(UIColor *)endColor
                startPoint:(CGPoint)startPoint
               startRadius:(CGFloat)startRadius
                  endPoint:(CGPoint)endPoint
                 endRadius:(CGFloat)endRadius
                   context:(CGContextRef)context
{
    CGColorRef colorRef = startColor.CGColor;
    CGColorRef endColorRef = endColor.CGColor;
    NSArray *marrColors=[NSArray arrayWithObjects:
                         (__bridge id)colorRef,    //start color
                         (__bridge id)endColorRef, //end color
                         nil];
    CFArrayRef colors =(__bridge CFArrayRef)(marrColors);
    CGColorSpaceRef colorSpc = CGColorSpaceCreateDeviceRGB();
    CGGradientRef gradient = CGGradientCreateWithColors(colorSpc, colors, Nil);

    // generates Radial Gradient
    CGContextDrawRadialGradient(context, gradient,
                                startPoint, startRadius,
                                endPoint, endRadius,
                                0);
    CGColorSpaceRelease(colorSpc);
    CGGradientRelease(gradient);
}
이 함수를 이용해서, 중심에 그리면, 위 만들이미지와 같은 효과를 얻을 수 있습니다.
Drawing a radial gradient like Lens
그러면, Gradient에 이미지를 추가하면 중간에 이미지가 추가가 됩니다.
source code
- (void)drawRadialGradient:(UIColor *)startColor
                  midColor:(UIColor *)midColor
                  endColor:(UIColor *)endColor
                startPoint:(CGPoint)startPoint
               startRadius:(CGFloat)startRadius
                  endPoint:(CGPoint)endPoint
                 endRadius:(CGFloat)endRadius
                   context:(CGContextRef)context
{
    CGColorRef colorRef = startColor.CGColor;
    CGColorRef midColorRef = midColor.CGColor;
    CGColorRef endColorRef = endColor.CGColor;
    NSArray *marrColors=[NSArray arrayWithObjects:(__bridge id)colorRef,
                         (__bridge id)midColorRef,
                         (__bridge id)endColorRef, nil];
    CFArrayRef colors =(__bridge CFArrayRef)(marrColors);
    CGColorSpaceRef colorSpc = CGColorSpaceCreateDeviceRGB();
    CGGradientRef gradient = CGGradientCreateWithColors(colorSpc, colors, Nil);

    // generates Radial Gradient
    CGContextDrawRadialGradient(context, gradient,
                                startPoint, startRadius,
                                endPoint, endRadius,
                                0);
    CGColorSpaceRelease(colorSpc);
    CGGradientRelease(gradient);
}
- (void)drawRect:(CGRect)rect {

    CGContextRef context = UIGraphicsGetCurrentContext();


    // Drawing code
    UIColor *whiteColor = [UIColor whiteColor];
    UIColor *blueColor = [UIColor blueColor];
    UIColor *greenColor = [UIColor greenColor];

    CGSize size = self.frame.size;
    CGPoint center = CGPointMake(size.width/2, size.height/2);
    /*/
    [self drawRadialGradient:greenColor endColor:self.backgroundColor
                  startPoint:center startRadius:0
                    endPoint:center endRadius:size.width/2
                     context:context];
    /*/
    [self drawRadialGradient:greenColor midColor:blueColor endColor:whiteColor
                  startPoint:center startRadius:0
                    endPoint:center endRadius:size.width/2
                     context:context];
    CGPoint point2 = CGPointMake(size.width/2-15, size.height/2-15);
    [self drawRadialGradient:whiteColor endColor:greenColor
                  startPoint:point2 startRadius:0
                    endPoint:point2 endRadius:5
                     context:context];
    point2 = CGPointMake(size.width/2+15, size.height/2+15);
    [self drawRadialGradient:whiteColor endColor:greenColor
                  startPoint:point2 startRadius:0
                    endPoint:point2 endRadius:2
                     context:context];
     //*/
}
결과물
 |
| 3가지 색으로만 |
 |
| 3가지 색에, 점 2개 찍은것 |
나름 랜즈와 비슷한 것이 나온것 같군요.
2014/12/11
[iOS] NSString으로 된 값을 파일로 직접 저장하자.
현재 App의 디렉토리 Path를 읽어 오고, 거기에 파일 이름을 추가합니다.
source code
이름을 정하고 나면, NSString에서 바로 저장합니다.
파일로부터 데이터를 읽어 올 경우도, NSString의 카테고리를 이용합니다.
만약, 문자열이 아닌 Binary데이터를 저장하려면, NSString대신, NSData의 카테고리 함수를 이용하면, 똑같이 사용이 가능합니다.
source code
- (NSURL *)urlForFilename:(NSString *)filename {
    NSFileManager *fm = [NSFileManager defaultManager];
    NSArray *urls = [fm URLsForDirectory:NSDocumentDirectory
                               inDomains:NSUserDomainMask];
    NSURL *directoryURL = urls[0];
    NSURL *fileURL = [directoryURL URLByAppendingPathComponent:filename];
    return fileURL;
}
이름을 정하고 나면, NSString에서 바로 저장합니다.
    BOOL status = [string writeToFile:[pathUrl.path stringByAppendingPathExtension:@"txt"]
                           atomically:YES
                             encoding:NSUTF8StringEncoding
                                error:&error];

    if (error != nil) {
        NSLog(@"save error: %@", [error description]);
    }
    if (status == NO) {
        NSLog(@"save error");
    }
파일로부터 데이터를 읽어 올 경우도, NSString의 카테고리를 이용합니다.
    NSString *string = [NSString stringWithContentsOfURL:pathUrl
                                                encoding:NSUTF8StringEncoding
                                                   error:&error];
    if (error != nil || string == nil) {
       NSLog(@"Can't load file: %@, error:%@", pathUrl.path, [error description]);
    }
만약, 문자열이 아닌 Binary데이터를 저장하려면, NSString대신, NSData의 카테고리 함수를 이용하면, 똑같이 사용이 가능합니다.
2014/10/10
[iOS] User Defined Runtime Attributes
User Defined Runtime Attributes란?
Xcode의 Interface Builder에서 특정한 UI 객체에 사용자가 정의하는 값을 바로 입력하는 기능을 말합니다.Storyboard에 정의된 객체에서 값을 설정할 수 있는 것으로, Identity Inspector tab에서 설정할 수 있습니다.
 |
| InterfaceBuilder의 User Defined Runtime Attributes 설정 화면과 시뮬레이터 표시 내용. |
위의 그림처럼 Interface Builder에서 UIView를 넣고, Identity Inspector Tab에서 값을 입력하게 되면, m파일에서 UIView의 객체를 연결해서, 직접 입력한 것처럼 동작하게 됩니다.
입력 할 수 있는 값은 어떤 것이 있을까요?

Number - NSNumber *
String - NSString *
Point - CGPoint
Size - CGSize
Rect - CGRect
Range - NSRange
Color - UIColor *
LocalizedString - NSString *
(Localizable.string 파일에서 Key를 입력하고, 해당 locale에 맞는 string을 입력)
Image - UIImage*
Xcode 6에서는 총 10가지를 입력할 수 있습니다.
위에 첫번째 이미지에서 layer.borderColor는 바로 설정할 수가 없습니다.
전달되는 객채는 UIColor이고, layer.borderColor는 CGColorRef를 사용하기 때문입니다.
가능한 방법은
CALayer의 카테고리를 생성하고, 그 카테고리에 setBorderColorFromUIColor 함수를 만들어 줍니다.
source code
#import "CALayer+extension.h"

@implementation CALayer (extension)
- (void)setBorderColorFromUIColor:(UIColor *)color
{
    self.borderColor = color.CGColor;
}
@end
h파일에도 함수를 선언해 주어야 합니다.
이제, InterfaceBuilder에서 layer.borderColorFromUIColor 를 사용해서, 색상을 설정할 수 있습니다.

위의 시뮬레이터에서 테두리 색상이 설정된 것을 볼 수 있습니다.
[참고]
- iOS-Blog : User Defined Runtime Attributes- ATOMIC SPIN : Expanding User-Defined Runtime Attributes in Xcode with Objective-C
2014/09/12
[iOS] 물방울 모양의 UIView를 만들자.
UIView의 모양을 물방울 모양으로 변형을 해보겠습니다.
1. UIBezierPath를 이용해서, 물방울 모양의 Path를 만듭니다.
source code
2. Path로 부터 현재 뷰의 layer의 mask를 설정합니다.
source code
3. 결과물

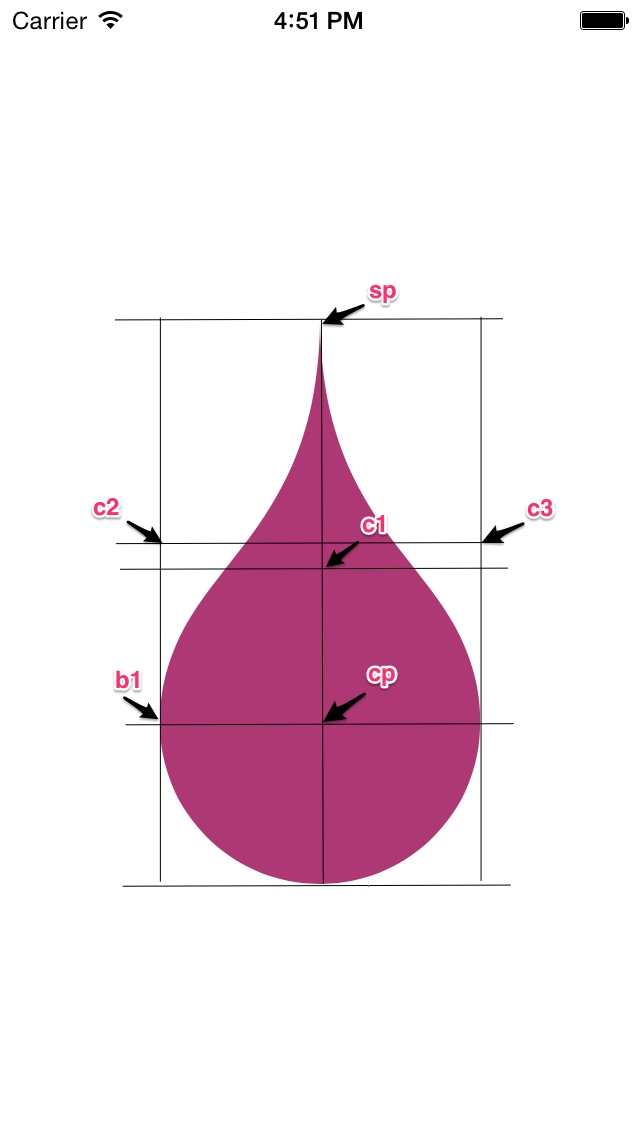
위 소스의 sp, cp, b1, c1, c2, c3 위치를 왼쪽에 표시하였습니다.
1. UIBezierPath를 이용해서, 물방울 모양의 Path를 만듭니다.
source code
- (UIBezierPath *)waterDropPath:(CGRect)frame
{
    //NSLog(@"makeWaterDropPathIn: %@", NSStringFromCGRect(frame) );
    float x = frame.origin.x;
    float y = frame.origin.y;
    float hW = frame.size.width/2.0f;
    float H = frame.size.height;

    CGPoint sp = CGPointMake(x+hW, y);      //Start point
    CGPoint cp = CGPointMake(x+hW, y+H-hW); //Center point

    CGPoint b1 = CGPointMake(x, y+H-hW);    //WaterDrop left point
    CGPoint c1 = CGPointMake(x+hW, y+hW+hW/2); //왼쪽 내려오는 부분에서 사용
    CGPoint c2 = CGPointMake(x, y+H-hW-hW);
    CGPoint c3 = CGPointMake(x+hW+hW, y+H-hW-hW); //오른쪽 올라가는 부분에서 사용

    UIBezierPath *path = [[UIBezierPath alloc] init];
    [path setLineWidth:0.5f];

    [path moveToPoint:sp]; //시작점으로 이동

    [path addCurveToPoint:b1
             controlPoint1:c1
             controlPoint2:c2]; //왼쪽 물방울 내려오는 부분

    [path addArcWithCenter:cp
                     radius:hW//-0.5f
                 startAngle:DEGREE_TO_RADIAN(180)
                   endAngle:DEGREE_TO_RADIAN(0)
                  clockwise:NO]; //물방울 아래부분

    [path addCurveToPoint:sp
             controlPoint1:c3
             controlPoint2:c1]; //오른쪽 올라가는 부분

    return path;
}
2. Path로 부터 현재 뷰의 layer의 mask를 설정합니다.
source code
- (void) setWaterDropClippingArea:(CGRect)frame
{
    //클립핑 영역을 만든다.
    [self setClippingAreaFromPath:[self waterDropPath:frame]];
}
- (void)setClippingAreaFromPath:(UIBezierPath *)path
{
    CAShapeLayer *mask = [CAShapeLayer layer];
    mask.path = path.CGPath;

    self.layer.mask = mask;
}
3. 결과물


위 소스의 sp, cp, b1, c1, c2, c3 위치를 왼쪽에 표시하였습니다.
2014/07/13
[iOS] 크기에 맞게 Font의 크기 줄이기.
Storyboard에서 문자열을 표시를 해야 되는데...
단어나, 길지 않은 문자열은 크기를 200포인트로 표시하고, 만약 길이가 길다면, 그보다 작은 크기로 크기가 맞을 때까지 폰트의 크기를 줄이는 기능이 필요합니다.
위 소스에서
1: 대상이 되는 문자열과, 그 문자열에 적용되어 있는 Font, 그리고 어떤 너비에서 계산을 해야 되는지 파라미터로 넘겨 줍니다.
2 : while문을 통해서, 크기가 작어질 때까지 적용 합니다.
3 : NSString의 boundingRectWithSize를 이용해서, 대략적인 rect를 구합니다.
여기에서, 너비의 90%정도를 고려해서 넣습니다. 100% 크기를 하면 옆으로 너무 딱 붙어서 계산이 되어서, 90%크기로 적용해 줍니다.
4 : 계산된 크기가, 대상 높이의 70%보다 크면, 줄여 줍니다. 70%는 대략적으로 생각한 것으로 높의 70%이하가 되는 것이 적당하였습니다. (적용할 때, 변경해서 보시면 됩니다.)
5 : 아직 커서 줄여야 되면, 현재 font 의 name과 크기의 90%를 적용해서 폰트를 다시 만들고 적용해 줍니다.
이 폰트를 가지고 while문 안에서 다시 계산을 하게 됩니다.
감사합니다.
단어나, 길지 않은 문자열은 크기를 200포인트로 표시하고, 만약 길이가 길다면, 그보다 작은 크기로 크기가 맞을 때까지 폰트의 크기를 줄이는 기능이 필요합니다.
//1
+ (UIFont *) spq_getFontForLabel:(NSString *)string font:(UIFont *)font size:(CGSize)size
{
    BOOL isEnough = NO;
    UIFont *afont = font;    //2
    while (!isEnough) {
        //3
        CGRect aboutRect = [string //높이를 구할 NSString
                            boundingRectWithSize:CGSizeMake(size.width*0.9, CGFLOAT_MAX)
                            options:NSStringDrawingUsesLineFragmentOrigin
                            attributes:@{NSFontAttributeName:font}
                            context:nil];
        //4
        if (aboutRect.size.height > (size.height*0.7)) {
            //5
            font = [UIFont fontWithName:font.fontName size:font.pointSize*0.9];
        }else{
            isEnough = YES;
            afont = font;
        }
    }
    return afont;
}
위 소스에서
1: 대상이 되는 문자열과, 그 문자열에 적용되어 있는 Font, 그리고 어떤 너비에서 계산을 해야 되는지 파라미터로 넘겨 줍니다.
2 : while문을 통해서, 크기가 작어질 때까지 적용 합니다.
3 : NSString의 boundingRectWithSize를 이용해서, 대략적인 rect를 구합니다.
여기에서, 너비의 90%정도를 고려해서 넣습니다. 100% 크기를 하면 옆으로 너무 딱 붙어서 계산이 되어서, 90%크기로 적용해 줍니다.
4 : 계산된 크기가, 대상 높이의 70%보다 크면, 줄여 줍니다. 70%는 대략적으로 생각한 것으로 높의 70%이하가 되는 것이 적당하였습니다. (적용할 때, 변경해서 보시면 됩니다.)
5 : 아직 커서 줄여야 되면, 현재 font 의 name과 크기의 90%를 적용해서 폰트를 다시 만들고 적용해 줍니다.
이 폰트를 가지고 while문 안에서 다시 계산을 하게 됩니다.
감사합니다.
[iOS] 문자열에 대해서, 언어 알아내기.
문자열에서 언어에 따라서 다른 폰트를 설정해야 하는 경우가 있습니다.
이럴 경우, NSString에서 언어를 알아내서, 적절하게 구분할 수 있습니다.
참고: How to deal with the iOS detect the NSString language, English can not be detected accurately?
이럴 경우, NSString에서 언어를 알아내서, 적절하게 구분할 수 있습니다.
- (NSString *)languageForString:(NSString *) text{
    return (NSString *)CFBridgingRelease(CFStringTokenizerCopyBestStringLanguage((CFStringRef)text, CFRangeMake(0, MIN(text.length, 100))));
}
참고: How to deal with the iOS detect the NSString language, English can not be detected accurately?
[iOS] 무료사운드 구해서, AVAudioPlayer로 Play하기
사운드 찾기
무료 사운드를 받을 수 있는 곳은 찾아보면 많습니다.- freeSFX : http://www.freesfx.co.uk/
필요한 mp3파일을 찾아서 다운받습니다.
사운드 변경하기
보통 MP3파일을 받게 되는데, 이것을 CAF파일로 변경합니다.
터미널에서 파일(bass_ring.mp3)를 caf로 변경합니다.
afconvert -f caff -d LEI16@22050 brass_ring.mp3 brass_ring.caf
iOS에서 play하기
AVAudioPlayer를 생성하고, 필요한 시점에 play/stop을 실행합니다.
//선언
  AVAudioPlayer *_backgroundMusic;

//viewDidLoad에서 준비
- (void)viewDidLoad
{
    [super viewDidLoad];
    // Do any additional setup after loading the view.
    NSURL *url = [[NSBundle mainBundle] URLForResource:@"brass_ring" withExtension:@"caf"];
    _backgroundMusic = [[AVAudioPlayer alloc] initWithContentsOfURL:url error:nil];
    [_backgroundMusic prepareToPlay];

}
//viewWillAppear에서 실행
- (void)viewWillAppear:(BOOL)animated{
    [_backgroundMusic play];
}
//viewWillDisappear에서 중지
- (void)viewWillDisappear:(BOOL)animated
{
    [_backgroundMusic stop];
}
2014/07/12
[iOS] CoreData관련한 몇가지 정리할 내용들..
개발하면서, CoreData를 사용할 때 필요한 내용을 정리합니다.
어떤 SQL문이 언제 호출이 되어서 실행이 되는지 보면, Commit을 언제 해야 될지 적절할 시기를 알 수 있습니다.
XCode의 Scheme을 드롭다운해서 열고, Edit Scheme을 선택, 'Run {app name}'을 선택하고, Arguments 탭에서 Arguments Passed On Launch에 '+'버튼을 선택해서 아래 내용을 추가합니다.
'-com.apple.CoreData.SQLDebug 1'
그리고 실행을 하면, 실제 SQL문이 어떻게 호출 되는지 표시가 됩니다.
CoreData에서 데이터를 fetch해서 가져오기 위해서, NSFetchRequest를 만들고, executeFetchRequest를 통해서, NSManagedObject의 형태로 받아 옵니다.
받아올 때, 필터링하기 위해서, NSPredicate를 설정하고, 정렬해서 보기 위해서 NSSortDescriptor를 설정합니다.
제가 필요한 것만 정리를 해 둡니다.
RAW SQL
CoreData관련 코드를 작성하고 테스트하다 보면, 실제 SQL이 어떻게 동작되는지 궁금할 때가 있습니다.어떤 SQL문이 언제 호출이 되어서 실행이 되는지 보면, Commit을 언제 해야 될지 적절할 시기를 알 수 있습니다.
XCode의 Scheme을 드롭다운해서 열고, Edit Scheme을 선택, 'Run {app name}'을 선택하고, Arguments 탭에서 Arguments Passed On Launch에 '+'버튼을 선택해서 아래 내용을 추가합니다.
'-com.apple.CoreData.SQLDebug 1'
그리고 실행을 하면, 실제 SQL문이 어떻게 호출 되는지 표시가 됩니다.
CoreData에서 Object가져오기.
AppDelegate에 추가한 함수를 통해서 managedContext를 받아와야 읽거나, 저장할 수 있습니다.CoreData에서 데이터를 fetch해서 가져오기 위해서, NSFetchRequest를 만들고, executeFetchRequest를 통해서, NSManagedObject의 형태로 받아 옵니다.
받아올 때, 필터링하기 위해서, NSPredicate를 설정하고, 정렬해서 보기 위해서 NSSortDescriptor를 설정합니다.
- (void) function
{
    NSError *error;
    SPQAppDelegate *appDelegate = [UIApplication sharedApplication].delegate;
    NSManagedObjectContext *managedContext = [appDelegate managedObjectContext];

    NSFetchRequest *request;
    request = [NSFetchRequest fetchRequestWithEntityName:entityName];
    request.predicate = [NSPredicate predicateWithFormat:@"name = %@ && created=%@", name, (created)?@"YES":@"NO"];
    NSSortDescriptor *sortDescriptor = [NSSortDescriptor sortDescriptorWithKey:@"name" ascending:YES];
    request.sortDescriptors = [NSArray arrayWithObject:sortDescriptor];
    NSArray *items = [managedContext executeFetchRequest:request error:&error];
    if (error != nil) {
        NSLog(@"executeFetchRequest: %@", [error localizedDescription]);
    }
  //....

}
새로운 Object 만들기
신규로 object를 만들고, 거기에 값을 넣은 후, 저장을 하면, CoreData에 저장이된다. item = [NSEntityDescription insertNewObjectForEntityForName:entityName //추가할 entity이름
inManagedObjectContext:managedContext];
기존 Object 지우기.
managedObject를 찾은 다음, 그 object를 manageObjectContext에서 삭제하면 된다.[managedContext deleteObject:item]; //item은 NSManageObject 임.
Boolean값을 비교하기
predicate를 만들 때, String은 '=='로 비교를 하지만, Bool인 경우에는 NSNumber를 이용해서 비교를 해야 한다.[NSPredicate predicateWithFormat:@"name == %@, created == %@", name, [NSNumber numberWithBool:created]];
제가 필요한 것만 정리를 해 둡니다.
2014/05/23
[iOS] Poster Scroll View를 만들어 봅니다.
영화관 앱에서 포스터를 옆으로 넘길 때, 현재 페이지의 이미지와, 다음페이지의 이미지가 약간 겹처서 넘어갑니다.
Yahoo 날씨 앱에서도 각 페이지를 양 옆으로 넘길 때, 이미지가 겹쳐서 넘어가게 됩니다.
이것을 스크롤 뷰를 이용해서 구현해 보도록 하겠습니다.
이 커스텀 뷰에서 추가된 내부 뷰가 이동할 때, 배경이 바깥 부분으로 나가지 않도록 레이어의 masksToBound도 설정해 준다.
오른쪽에서 왼쪽으로 다음페이지의 이미지가 나올 때는, 현재 위치를 계산해서, 중간에서 오른쪽으로 이동하도록 하고,
왼쪽에서 오른쪽으로 이전 페이지의 이미지가 나올 때, 중간에서 왼쪽으로 이동하도록 한다.
source code
- DBUMoviePosterView
source code

Yahoo 날씨 앱에서도 각 페이지를 양 옆으로 넘길 때, 이미지가 겹쳐서 넘어가게 됩니다.
이것을 스크롤 뷰를 이용해서 구현해 보도록 하겠습니다.
1. 전체 구현방법
스크롤 뷰에 현재 frame크기의 각 페이지로 커스텀 뷰(DBUMoviePosterView)를 추가하고, 화면이 이동할 때, 커스텀 뷰에서 이미지의 위치를 조정해주게 된다.이 커스텀 뷰에서 추가된 내부 뷰가 이동할 때, 배경이 바깥 부분으로 나가지 않도록 레이어의 masksToBound도 설정해 준다.
오른쪽에서 왼쪽으로 다음페이지의 이미지가 나올 때는, 현재 위치를 계산해서, 중간에서 오른쪽으로 이동하도록 하고,
왼쪽에서 오른쪽으로 이전 페이지의 이미지가 나올 때, 중간에서 왼쪽으로 이동하도록 한다.
2. 소스 구현
- DBUScrollViewsource code
@interface DBUScollView()
@property (nonatomic, strong) NSMutableArray *posters;
@end

@implementation DBUScollView
- (id)initWithCoder:(NSCoder *)aDecoder
{
    self = [super initWithCoder:aDecoder];
    if (self) {
        self.delegate = self;
    }
    return self;
}
- (NSMutableArray *)posters
{
    if (_posters == nil) {
        _posters = [NSMutableArray array];
    }
    return _posters;
}
- (void)addPoster:(UIImage *)image
{
    CGSize size = self.frame.size;
    //포스터 전체 개수
    NSUInteger posterTotalCount = [self.posters count];
    //content 영역 설정
    self.contentSize = CGSizeMake(size.width * (posterTotalCount+1), size.height);
    // 포스터 뷰 생성 및 추가
    DBUMoviePosterView *posterView = [[DBUMoviePosterView alloc] initWithFrame:CGRectMake(size.width*(posterTotalCount), 0, size.width, size.height)];
    UIImageView *imageView = [[UIImageView alloc] initWithFrame:posterView.bounds];
    imageView.image = image;
    [posterView addView:imageView];
    [self addSubview:posterView];

    //위치 이동을 위해서, Array로 보관
    [self.posters addObject:posterView];
}

#pragma mark - UIScrollViewDelegate
- (void)posterImagePosition:(NSInteger)posterIndex point:(CGPoint)point
{
    if (posterIndex < 0 || posterIndex >= self.posters.count) {
        return; //페이지 수를 벗어난 것이면, 무시한다.
    }
    DBUMoviePosterView *posterView = (DBUMoviePosterView *)self.posters[posterIndex];
    if (posterView == nil) return;
    [posterView moveViewPosition:point]; //각 포스터 뷰에서 내부 뷰를 이동시킨다.
}
- (void)scrollViewDidScroll:(UIScrollView *)scrollView
{
    //현재 페이지를 계산해서, 연재와 다음 것만 움직이도록 한다.
    NSUInteger currentPage = scrollView.contentOffset.x / scrollView.frame.size.width;
    //계산은 각 포스터 뷰에서 계산한다.
    [self posterImagePosition:currentPage point:scrollView.contentOffset];
    [self posterImagePosition:currentPage+1 point:scrollView.contentOffset];
}
@end
- DBUMoviePosterView
source code
#import "DBUMoviePosterView.h"
@interface DBUMoviePosterView()
{
    UIView *_view;
}
@end

@implementation DBUMoviePosterView
- (id)initWithFrame:(CGRect)frame
{
    self = [super initWithFrame:frame];
    if (self) {
        // Initialization code
        self.layer.masksToBounds = YES;//
    }
    return self;
}
- (void) addView:(UIView *)view
{
    if (_view != nil) {
        [_view removeFromSuperview];
        _view = nil;
    }
    _view = view;
    [self addSubview:view];
}
- (void) moveViewPosition:(CGPoint)point
{
        CGFloat width = self.frame.size.width;
    CGFloat height = self.frame.size.height;
    CGFloat x = point.x - self.frame.origin.x;

    if (x > -width && x < width) {
        //현재 위치와 비교한 값의 절반을 x좌표로 한다.
        _view.frame = CGRectMake(x/2, point.y, width, height);
    }
}
- (void) moveViewPositionToInitial
{
    //(0,0)으로 원위치 시킴.
    [self moveViewPosition:CGPointMake(0, 0)];
}
3. 결과물

2014/05/22
[iOS] sizeWithFont를 대체하는 함수 사용법
iOS7이전에는 NSString이 특정 가로 크기에서 줄바꿈 등을 통해서, 높이가 얼마나 되는지 알아보기 위해서는 sizeWithFont:constrainedToSize를 사용하였는데, 7.0에서는 Deprecated가 되어서 변경해야 합니다.
iOS7에서는 font뿐만 아니라, 다른 Attribute들도 높이를 구할 때 필요하므로 font만 참고하는 것이 아니라, attributes라고 NSDictionary를 받아서 구하게 됩니다.
sizeWithFont:constrainedToSize (Deprecated)
Xcode5에서는 boundingRectWithSize:options:attributes:context:를 사용하라고 나옵니다.
만약 일반 NSString이 아니고, NSAttributedString을 사용하고 있으면, attributes가 없는 함수를 사용하면 됩니다.
정리해 둡니다.
iOS7에서는 font뿐만 아니라, 다른 Attribute들도 높이를 구할 때 필요하므로 font만 참고하는 것이 아니라, attributes라고 NSDictionary를 받아서 구하게 됩니다.
sizeWithFont:constrainedToSize (Deprecated)
    //특정 영역 (268, 4000)의 크기에서 myString에 있는 글의 높이를 iOS6에서 구하는 방법
    UIFont *font = [UIFont fontWithName:@"HelveticaNeue-Light" size:10];
    CGSize aboutSize = [myString sizeWithFont:font constrainedToSize:CGSizeMake(268, 4000)];
Xcode5에서는 boundingRectWithSize:options:attributes:context:를 사용하라고 나옵니다.
    //폰트가 따로 정리가 되어 있지 않는 경우는
    UIFont *font = [UIFont fontWithName:@"HelveticaNeue-Light" size:10];
    CGRect aboutRect = [myString //높이를 구할 NSString
                          boundingRectWithSize:CGSizeMake(268, CGFLOAT_MAX)
                                       options:NSStringDrawingUsesLineFragmentOrigin
                                    attributes:@{NSFontAttributeName:font}
                                       context:nil];
만약 일반 NSString이 아니고, NSAttributedString을 사용하고 있으면, attributes가 없는 함수를 사용하면 됩니다.
    //폰트가 따로 정리가 되어 있지 않는 경우는
    UIFont *font = [UIFont fontWithName:@"HelveticaNeue-Light" size:10];
    NSAttributedString *myAttributedString = [[NSAttributedString alloc] initWithString:myString

    CGRect aboutRect = [myAttributedString //높이를 구할 NSAttributedString
                         boundingRectWithSize:CGSizeMake(268, CGFLOAT_MAX)
                                      options:NSStringDrawingUsesLineFragmentOrigin
                                      context:nil];
정리해 둡니다.
2014/05/17
[iOS] Facebook에 글과 이미지, 링크 등록하기.
iOS6 부터 Facebook에 글을 올릴 수 있는 방법을 제공하고 있습니다.
내부 동작방식은 Twitter에 올리는 것과 동일한 방법에 서비스 타입만 변경하면 됩니다.
Twitter에 글 올리기
위의 트위터에 글 올리기에 설명한 것과 같이, 이미지와 URL을 추가할 수 있습니다.
source code
페이스북에 대한 연결이 되어 있지 않은 경우, 아래와 비슷하게 업로드를 할 수 없다고 알려줘야 합니다.
만약, 아이디가 설정이 되어 있으면, 아래와 같이 Facebook Composer가 표시가 됩니다.
이미지를 어느 앨범에 올릴지, 현재 위치를 추가할지, 공개를 어느 범위까지 할지 표시합니다.
만약, 이 화면에서 Post를 했는데, 인터넷 연결이 안되어 있는 경우, 아래와 같이 표시가 됩니다.
참고:
- Integrating Twitter and Facebook into iOS7 Applications
- Mobile and Social Network Technology - Tutorial: How to use inbuilt Facebook/Twitter API in iOS6
- iOS Programming 101: Integrate Twitter and Facebook Sharing in Your App.
- Open Source Control For Creating SLComposeViewController Type Views For Any Social Network
내부 동작방식은 Twitter에 올리는 것과 동일한 방법에 서비스 타입만 변경하면 됩니다.
Twitter에 글 올리기
위의 트위터에 글 올리기에 설명한 것과 같이, 이미지와 URL을 추가할 수 있습니다.
source code
- (IBAction)uploadToFacebook:(UIBarButtonItem *)sender {
    if ([SLComposeViewController isAvailableForServiceType:SLServiceTypeFacebook]) {
        SLComposeViewController *composer = [SLComposeViewController composeViewControllerForServiceType:SLServiceTypeFacebook];
        [composer setInitialText:@"Initial Text for Facebook :)"];//초기 메시지.
        [composer addImage:self.uploadImage]; //추가할 이미지
        [composer addURL:[NSURL URLWithString:APP_URL_IN_ITUNES]];//추가할 URL
        composer.completionHandler = ^(SLComposeViewControllerResult result){
            switch(result) {
                    //  This means the user cancelled without sending the Tweet
                case SLComposeViewControllerResultCancelled:
                    break;
                    //  This means the user hit 'Send'
                case SLComposeViewControllerResultDone:
                    break;
            }
        };
        [self presentViewController:composer animated:YES completion:^{
            //NSLog(@"present completed");
        }];
    }else{
        UIAlertView *alertView = [[UIAlertView alloc] initWithTitle:@"Sorry"
                                                            message:@"You can't upload this page to Facebook right now, make sure your device has an internet connection and you have at least one Facebook account setup"
                                                           delegate:self cancelButtonTitle:@"OK"
                                                  otherButtonTitles: nil];
        [alertView show];
    }
}
페이스북에 대한 연결이 되어 있지 않은 경우, 아래와 비슷하게 업로드를 할 수 없다고 알려줘야 합니다.
 |
| Upload가 불가능함을 알림. |
 |
| 페이스북 타입의 SLComposeViewController |
만약, 이 화면에서 Post를 했는데, 인터넷 연결이 안되어 있는 경우, 아래와 같이 표시가 됩니다.
 |
| Facebook에 Upload하지 못할 경우 표시화면 |
참고:
- Integrating Twitter and Facebook into iOS7 Applications
- Mobile and Social Network Technology - Tutorial: How to use inbuilt Facebook/Twitter API in iOS6
- iOS Programming 101: Integrate Twitter and Facebook Sharing in Your App.
- Open Source Control For Creating SLComposeViewController Type Views For Any Social Network
2014/05/16
[iOS6] Twitter에 이미지와 링크 올리기
iOS6에서 트위터에 이미지와 글을 올릴 수 있는 방법을 자체 Framework으로 제공하고 있습니다.
Social.framework를 추가하고, social/social.h 를 임포트한 후에 실행 시킬 수 있습니다.
1. 트윗을 보낼 수 있는지 확인하는 코드
SLComposerViewController의 isAvailableForServiceType 함수를 통해서 확인할 수 있으며, 전송하지 못할 경우, 사용자에게 적절한 문구를 보여줘야 합니다.
2. 전송한 결과값을 받아야 하는 경우
completionHandler에 블록 함수를 설정해서, 결과를 받아올 수 있습니다.
3. 초기 메시지 추가
- setInitialText를 통해서 초기 메시지를 넣을 수 있습니다.
4. 이미지 추가
- addImage : 이미지를 추가할 수 있습니다.
5. URL 추가
- addURL: NSURL객체를 추가할 수 있습니다.
source code
설정에 트위터 아이디가 설정이 되어 있지 않으면, 아래와 같이 표시가 됩니다.
아이디가 설정화면에서 정상적으로 설정이 되어 있으면, 아래와 같이 표시됩니다.
만약 작성 중에, 인터넷 연결이 끊기게 되면, 아래와 같이 Post를 하였을 때, 표시됩니다.
개발자가 해준 부분은 없으며, 시스템에서 자동으로 표시하는 화면입니다.
위 화면이 표시될 경우에도, completionHandler에는 정상적으로 전송이 되었다고 결과 값을 리턴하게 되므로, 구분을 잘할 수 있어야 겠습니다.
Ray Wenderlich : Beginning Twitter in iOS6 Tutorial
Social.framework를 추가하고, social/social.h 를 임포트한 후에 실행 시킬 수 있습니다.
1. 트윗을 보낼 수 있는지 확인하는 코드
SLComposerViewController의 isAvailableForServiceType 함수를 통해서 확인할 수 있으며, 전송하지 못할 경우, 사용자에게 적절한 문구를 보여줘야 합니다.
2. 전송한 결과값을 받아야 하는 경우
completionHandler에 블록 함수를 설정해서, 결과를 받아올 수 있습니다.
3. 초기 메시지 추가
- setInitialText를 통해서 초기 메시지를 넣을 수 있습니다.
4. 이미지 추가
- addImage : 이미지를 추가할 수 있습니다.
5. URL 추가
- addURL: NSURL객체를 추가할 수 있습니다.
source code
#import@import Social; ... - (IBAction)tweetThisPage:(UIBarButtonItem *)sender { if ([SLComposeViewController isAvailableForServiceType:SLServiceTypeTwitter]) { SLComposeViewController *composer = [SLComposeViewController composeViewControllerForServiceType:SLServiceTypeTwitter]; [composer setInitialText:@"This is my first tweet in my app!"]; [composer addImage:[self loadImage]]; [composer addURL:[NSURL URLWithString:APP_URL_IN_ITUNES]]; composer.completionHandler = ^(SLComposeViewControllerResult result){ switch(result) { // This means the user cancelled without sending the Tweet case SLComposeViewControllerResultCancelled: NSLog(@"Canceled"); break; // This means the user hit 'Send' case SLComposeViewControllerResultDone: NSLog(@"Tweet Done"); break; } }; [self presentViewController:composer animated:YES completion:^{ NSLog(@"Tweet Composer present completed"); }]; }else{
        //트위터 아이디가 설정되어 있지 않거나, 인터넷에 연결이 안되어 있는 경우..
        UIAlertView *alertView = [[UIAlertView alloc] initWithTitle:@"Sorry"
                                                            message:@"You can't send a tweet right now, make sure your device has an internet connection and you have at least one Twitter account setup"
                                                           delegate:self cancelButtonTitle:@"OK"
                                                  otherButtonTitles: nil];
        [alertView show];
    }
}
설정에 트위터 아이디가 설정이 되어 있지 않으면, 아래와 같이 표시가 됩니다.
 |
| Twitter ID가 없는 경우 |
 |
| 설정된 트위터 아이디로 트윗을 작성중. |
개발자가 해준 부분은 없으며, 시스템에서 자동으로 표시하는 화면입니다.
 |
| 트윗을 보내지 못했을 때, 표시화면 |
참고:
트위터 개발자 센터 문서: Integrating with Twitter on iOSRay Wenderlich : Beginning Twitter in iOS6 Tutorial
2014/05/12
[iOS] UIScrollView에서 현재 중심이 되는 페이지 얻어오기.
ScrollView에서 페이지 단위로 뷰를 로딩해서 화면에 보여줄 경우, 현재 페이지의 앞뒤 페이지만 로딩하도록 해서 지금 필요한 페이지만 메모리를 사용할 수 있게 만들어야 됩니다.
100페이지의 ScrollView라 할지라도, 현재는 3페이지만 로딩하도록 하는 것입니다.
이 경우, 현재 페이지가 몇 페이지인지 알아야 합니다.
페이지를 가로로 이동하는 경우에는, 페이지의 너비와 현재 페이지의 x좌표를 이용하여 알아낼 수 있습니다.
사용자가 페이지를 터치해서 이동할 경우, scrollView.contentOffset.x 값이 변하게 됩니다.
source code
페이지를 왼쪽으로 이동시키다가, 현재 화면의 반을 넘어가는 경우, 다음 페이지가 되고, 오른쪽으로 이동시키다가 현재 페이지의 반 이하가 남게 되면, 이전 페이지로 인식해야 합니다.
현재 페이지 = (x좌표 / 페이지너비 + 0.5)값의 반내림
현재 페이지 = ((x좌표 + 1/2*페이지너비) / 페이지너비) 값의 반내림
현재 페이지 = ((x좌표 + 페이지너비) / (2*페이지너비)) 값의 반내림
scrollView가 가로로 Scroll되었을 때, 현재 페이지를 알 수 있으므로, 페이지가 변경되면, 앞뒤 페이지를 로딩하여, 미리 준비하면 됩니다.
[참조] : http://www.raywenderlich.com/10518/how-to-use-uiscrollview-to-scroll-and-zoom-content
100페이지의 ScrollView라 할지라도, 현재는 3페이지만 로딩하도록 하는 것입니다.
이 경우, 현재 페이지가 몇 페이지인지 알아야 합니다.
페이지를 가로로 이동하는 경우에는, 페이지의 너비와 현재 페이지의 x좌표를 이용하여 알아낼 수 있습니다.
사용자가 페이지를 터치해서 이동할 경우, scrollView.contentOffset.x 값이 변하게 됩니다.
source code
- (void)scrollViewDidScroll:(UIScrollView *)scrollView
{
    CGFloat pageWidth = self.scrollView.frame.size.width;
    NSInteger page = (NSInteger)floor((self.scrollView.contentOffset.x * 2.0f + pageWidth) / (pageWidth * 2.0f));
    NSLog(@"scrollView.contentOffset.x: %f, page:%d", scrollView.contentOffset.x, page);

}
페이지를 왼쪽으로 이동시키다가, 현재 화면의 반을 넘어가는 경우, 다음 페이지가 되고, 오른쪽으로 이동시키다가 현재 페이지의 반 이하가 남게 되면, 이전 페이지로 인식해야 합니다.
현재 페이지 = (x좌표 / 페이지너비 + 0.5)값의 반내림
현재 페이지 = ((x좌표 + 1/2*페이지너비) / 페이지너비) 값의 반내림
현재 페이지 = ((x좌표 + 페이지너비) / (2*페이지너비)) 값의 반내림
- (void)scrollViewDidScroll:(UIScrollView *)scrollView
{
    CGFloat pageWidth = self.scrollView.frame.size.width;
    NSInteger page = (NSInteger)floor((self.scrollView.contentOffset.x * 2.0f + pageWidth) / (pageWidth * 2.0f));
    NSLog(@"scrollView.contentOffset.x: %f, page:%d", scrollView.contentOffset.x, page);

}
scrollView가 가로로 Scroll되었을 때, 현재 페이지를 알 수 있으므로, 페이지가 변경되면, 앞뒤 페이지를 로딩하여, 미리 준비하면 됩니다.
[참조] : http://www.raywenderlich.com/10518/how-to-use-uiscrollview-to-scroll-and-zoom-content
[iOS] CALayer를 이용한 액자 모양 그림자 넣기.
그 방식에 shadowPath를 설정하여서 그림자의 모양을 변형하는 방법을 정리합니다.
참조: NSCookbook - iOS Programming Recipe 10: Adding A Shadow To UIView
ViewController에 UIImageView를 하나 추가하고, 아래와 같이 설정을 합니다.
source code
    CALayer *layer = self.imageView.layer;
    layer.shadowOffset = CGSizeMake(1, 1);
    layer.shadowColor = [[UIColor blackColor] CGColor];
    layer.shadowRadius = 3.0f;
    layer.shadowOpacity = 0.80f;

    CGRect rect = self.imageView.frame;
    CGSize size = rect.size;
    CGFloat offset = 15.0f;
    UIBezierPath *path = [UIBezierPath bezierPath]; //Path를 설정
    [path moveToPoint:CGPointMake(0.0, offset)];
    [path addLineToPoint:CGPointMake(size.width, offset)];
    [path addLineToPoint:CGPointMake(size.width, size.height+offset)];
    [path addCurveToPoint:CGPointMake(0.0, size.height+offset)
            controlPoint1:CGPointMake(size.width-offset,size.height)
            controlPoint2:CGPointMake(offset, size.height)];
    [path closePath];
    layer.shadowPath = [path CGPath];
위의 shadowPath를 bezierPath로 만들어서 넣으면 그 Path를 따라서 그림자가 생기게 됩니다.


[참고]
이미지 URL: http://i.dailymail.co.uk/i/pix/2014/05/04/article-2620040-1D92597400000578-908_306x423.jpg
피드 구독하기:
글 (Atom)