먼저 TableViewController의 경우, NSFetchedResultController를 사용하면 가장 효율적으로 관리할 수 있습니다.
특정 개수만 로딩 시켜서, 화면에 표시하므로 모든 데이터를 가져올 필요가 없게 됩니다.
하지만, 특정 경우, 지금 그 Entity의 개수가 몇개인지 알아야 할 경우가 있습니다.
이런때, 해당 Entity가 데이터가 크면, 그 개수 만큼의 NSManagedObject가 만들어지고, 데이터도 다 로딩 되므로, 순간 메모리 사용량이 커지게 됩니다.
이 경우, NSFetchRequest의 setIncludeSubentities를 NO로 해서 subentity들이 로딩 되지 않도록 하고,
context의 countForFetchRequest를 사용해서 해당되는 개수만 읽어 올 수 있게 됩니다.
참조: StackOverflow: Cocoa Core Data efficient way to count entities!
David Bae의 iOS 개발 이야기 (@davidbae) 재미있는 앱 개발을 위하여 개발 자료를 정리합니다. 필요한 것은 댓글로 알려주세요.
2015/01/20
2014/07/12
[iOS] CoreData관련한 몇가지 정리할 내용들..
개발하면서, CoreData를 사용할 때 필요한 내용을 정리합니다.
어떤 SQL문이 언제 호출이 되어서 실행이 되는지 보면, Commit을 언제 해야 될지 적절할 시기를 알 수 있습니다.
XCode의 Scheme을 드롭다운해서 열고, Edit Scheme을 선택, 'Run {app name}'을 선택하고, Arguments 탭에서 Arguments Passed On Launch에 '+'버튼을 선택해서 아래 내용을 추가합니다.
'-com.apple.CoreData.SQLDebug 1'
그리고 실행을 하면, 실제 SQL문이 어떻게 호출 되는지 표시가 됩니다.
CoreData에서 데이터를 fetch해서 가져오기 위해서, NSFetchRequest를 만들고, executeFetchRequest를 통해서, NSManagedObject의 형태로 받아 옵니다.
받아올 때, 필터링하기 위해서, NSPredicate를 설정하고, 정렬해서 보기 위해서 NSSortDescriptor를 설정합니다.
제가 필요한 것만 정리를 해 둡니다.
RAW SQL
CoreData관련 코드를 작성하고 테스트하다 보면, 실제 SQL이 어떻게 동작되는지 궁금할 때가 있습니다.어떤 SQL문이 언제 호출이 되어서 실행이 되는지 보면, Commit을 언제 해야 될지 적절할 시기를 알 수 있습니다.
XCode의 Scheme을 드롭다운해서 열고, Edit Scheme을 선택, 'Run {app name}'을 선택하고, Arguments 탭에서 Arguments Passed On Launch에 '+'버튼을 선택해서 아래 내용을 추가합니다.
'-com.apple.CoreData.SQLDebug 1'
그리고 실행을 하면, 실제 SQL문이 어떻게 호출 되는지 표시가 됩니다.
CoreData에서 Object가져오기.
AppDelegate에 추가한 함수를 통해서 managedContext를 받아와야 읽거나, 저장할 수 있습니다.CoreData에서 데이터를 fetch해서 가져오기 위해서, NSFetchRequest를 만들고, executeFetchRequest를 통해서, NSManagedObject의 형태로 받아 옵니다.
받아올 때, 필터링하기 위해서, NSPredicate를 설정하고, 정렬해서 보기 위해서 NSSortDescriptor를 설정합니다.
- (void) function { NSError *error; SPQAppDelegate *appDelegate = [UIApplication sharedApplication].delegate; NSManagedObjectContext *managedContext = [appDelegate managedObjectContext]; NSFetchRequest *request; request = [NSFetchRequest fetchRequestWithEntityName:entityName]; request.predicate = [NSPredicate predicateWithFormat:@"name = %@ && created=%@", name, (created)?@"YES":@"NO"]; NSSortDescriptor *sortDescriptor = [NSSortDescriptor sortDescriptorWithKey:@"name" ascending:YES]; request.sortDescriptors = [NSArray arrayWithObject:sortDescriptor]; NSArray *items = [managedContext executeFetchRequest:request error:&error]; if (error != nil) { NSLog(@"executeFetchRequest: %@", [error localizedDescription]); } //.... }
새로운 Object 만들기
신규로 object를 만들고, 거기에 값을 넣은 후, 저장을 하면, CoreData에 저장이된다.item = [NSEntityDescription insertNewObjectForEntityForName:entityName //추가할 entity이름 inManagedObjectContext:managedContext];
기존 Object 지우기.
managedObject를 찾은 다음, 그 object를 manageObjectContext에서 삭제하면 된다.[managedContext deleteObject:item]; //item은 NSManageObject 임.
Boolean값을 비교하기
predicate를 만들 때, String은 '=='로 비교를 하지만, Bool인 경우에는 NSNumber를 이용해서 비교를 해야 한다.[NSPredicate predicateWithFormat:@"name == %@, created == %@", name, [NSNumber numberWithBool:created]];
제가 필요한 것만 정리를 해 둡니다.
2013/12/26
[iOS] CoreData를 이용하여 데이터를 저장하자.
iOS에서 SQLite 를 이용하여, 데이터를 저장하고 읽어 올 수 있는데, 그러기 위해서는 SQL문과 관련 지식이 필요합니다.
하지만, CoreData를 이용하면, SQL에 대한 이해없이도, 비교적 간단하게 데이터를 저장할 수 있습니다.
SQL문을 직접사용하지 않더라도, 내부적으로 Wrapping이 되어서 SQLite에 저장하게 됩니다.
먼저 CoreData Framework을 사용하기 위해서는 해당 프로젝트에서 CoreData를 사용할 수 이도록 설정을 해줘야 합니다.
가장 간단한 방법은 프로젝트를 Empty Application으로 만들면서, CoreData사용을 체크하면, 저장을 수 있도록 기본 소스가 추가됩니다.
만약, Single Application으로 프로젝트를 이미 만들어서 사용하고 있다면, 해당 기능들만 추가하면 사용이 가능합니다.
추가하는 방법은 블로그의 "[iOS] CoreData를 사용하기 위해서 추가할 것들.."을 참고하여 주세요.
1. Data Model 추가하기.
데이터베이스의 스키마와 같은 파일을 추가합니다. New File > Core Data > Data Model 을 선택해서 추가합니다.
프로젝트에 Model.xcdatamodeld이 추가되었을 것입니다.
이 파일에 저장하고자 하는 형태의 데이터 엔티티를 저장합니다.
즉, 이 엔티티가 하나의 객체/단위로 저장이 될 것입니다.
사용자가 앱을 실행한 시간을 저장을 한다고 생각하면, 현재 날짜를 가지는 Attribute를 아래와 같이 추가할 수 있습니다.
2. 추가한 데이터 모델을 저장소와 연결하기.
AppDelegate에 추가된 managedObjectModel 함수에 1.에서 추가된 데이터 모델에 대한 파일 이름을 설정해 줍니다.
위에 데이터 모델이름이 프로젝트 생성할 때 "CoreData사용"으로 만들어지면 프로젝트 이름과 동일하게 만들어집니다.
그래서, 별도로 데이터모델 파일을 생성한 경우에는 그 파일을 이름을 위에 넣어야 변경이 됩니다.
3. 데이터 저장되는지 확인하기.
AppDelegate의 [-application didFinishLaunchingWithOptions:]함수에서 현재 시간을 저장하여 봅시다.
source code
- (BOOL)application:(UIApplication *)application didFinishLaunchingWithOptions:(NSDictionary *)launchOptions { // Override point for customization after application launch. NSManagedObjectContext *context = self.managedObjectContext; NSManagedObject *managedObject = [NSEntityDescription insertNewObjectForEntityForName:@"UsageStatisticDate" inManagedObjectContext:context]; [managedObject setValue:@"2013-12-26" forKey:@"executedate"]; //날짜는 임의로 넣었습니다. NSError *error; [context save:&error]; return YES; }
4. SQLite에 저장되어 있는지 터미널로 확인해 봅시다.
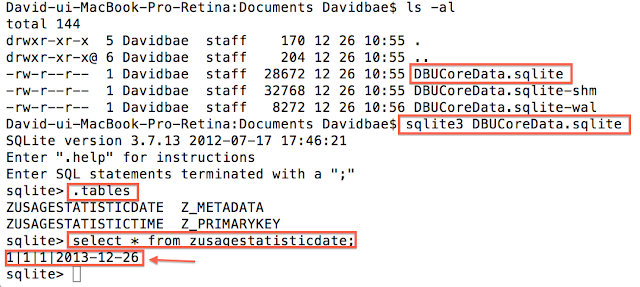
위에서 저장한 것이 정확하게 저장이 되어 있는지 확인을 해보기 위해서, iPhoneSimulator에 해당 앱이 저장된 위치를 터미널로 찾아갑니다.
(Library/Application Suport/iPhone Simulator/'버전'/Applications/'.....'/Documents/)
여기에서 sqlite3로 해당 db를 열어서 내용을 확인합니다.
위에서 해당 디렉토리에서 DBUCoreDate.sqlite라는 이름의 파일이 존재합니다.
이 파일을 sqlist3 명령어로 열어서, 저장되어 있는 테이블(.tables)과 테이블 내의 데이터를 SQL문(select * from zusagestatisticdate)로 확인을 해보았습니다.
"2013-12-26"이 들어 있는 것을 볼 수 있습니다.
Menu > Editor > Create NSManagedObject Subclass.. 를 선택하여 클래스 만듭니다.
파일이 두개가 추가됩니다.
3.에서 저장했던 방식을 아래와 같이 수정을 합니다.
source code
위 파일에서는 Subclass를 이용해서 저장하게 됩니다.
저장한 것을 터미널에서 다시 확인을 해 봅니다.
(Library/Application Suport/iPhone Simulator/'버전'/Applications/'.....'/Documents/)
여기에서 sqlite3로 해당 db를 열어서 내용을 확인합니다.
위에서 해당 디렉토리에서 DBUCoreDate.sqlite라는 이름의 파일이 존재합니다.
이 파일을 sqlist3 명령어로 열어서, 저장되어 있는 테이블(.tables)과 테이블 내의 데이터를 SQL문(select * from zusagestatisticdate)로 확인을 해보았습니다.
"2013-12-26"이 들어 있는 것을 볼 수 있습니다.
5. NSManagedObject를 추가해서 저장해 봅시다.
위에 4번에서는 NSManagedObject를 받아와서, setValue를 통해서 저장을 하였는데, 해당 클래스를 만들어서 저장할 수 있습니다.Menu > Editor > Create NSManagedObject Subclass.. 를 선택하여 클래스 만듭니다.
파일이 두개가 추가됩니다.
3.에서 저장했던 방식을 아래와 같이 수정을 합니다.
source code
- (BOOL)application:(UIApplication *)application didFinishLaunchingWithOptions:(NSDictionary *)launchOptions { // Override point for customization after application launch. NSManagedObjectContext *context = self.managedObjectContext; UsageStatisticDate *usageDate = [NSEntityDescription insertNewObjectForEntityForName:@"UsageStatisticDate" inManagedObjectContext:context]; usageDate.executedate = @"2013-12-26 using UsageStatisticDate class"; NSError *error; [context save:&error]; return YES; }
위 파일에서는 Subclass를 이용해서 저장하게 됩니다.
저장한 것을 터미널에서 다시 확인을 해 봅니다.
[iOS] CoreData를 사용하기 위해서 추가할 것들..
내가 생성한 Single View Application에서 CoreData를 사용하기 위해서, 아래 사항들을 추가해 줍니다.
아래에 추가되는 것은, Xcode에서 새로운 프로젝트를 만들 때, Empty Application에서 Use CoreData를 체크하였을 때 추가되는 부분입니다.
자세한 내용은 블로그([iOS] CoreData를 이용하여 데이터를 저장하자.)를 참고하여 주세요.
아래에 추가되는 것은, Xcode에서 새로운 프로젝트를 만들 때, Empty Application에서 Use CoreData를 체크하였을 때 추가되는 부분입니다.
1. CoreData Framework 추가하기.
프로젝트 설정의 General에서 Linked Framework and Libraries에서 CoreData를 추가합니다.
2. Precompile Header에 CoreData.h 추가하기.
프로젝트에서 해당 클래스를 사용할 수 있도록 Prefix파일에 추가해 줍니다.
(파일이름이 '프로젝트이름-Prefix.pch'인 파일입니다.)
3. AppDelegate.h에 @Property 및 함수 추가하기
source code@property (readonly, strong, nonatomic) NSManagedObjectContext *managedObjectContext; @property (readonly, strong, nonatomic) NSManagedObjectModel *managedObjectModel; @property (readonly, strong, nonatomic) NSPersistentStoreCoordinator *persistentStoreCoordinator; - (void)saveContext; - (NSURL *)applicationDocumentsDirectory;
4. AppDelegate.m에 관련 함수 추가하기.
source code- (void)saveContext { NSError *error = nil; NSManagedObjectContext *managedObjectContext = self.managedObjectContext; if (managedObjectContext != nil) { if ([managedObjectContext hasChanges] && ![managedObjectContext save:&error]) { // Replace this implementation with code to handle the error appropriately. // abort() causes the application to generate a crash log and terminate. You should not use this function in a shipping application, although it may be useful during development. NSLog(@"Unresolved error %@, %@", error, [error userInfo]); abort(); } } } #pragma mark - Core Data stack // Returns the managed object context for the application. // If the context doesn't already exist, it is created and bound to the persistent store coordinator for the application. - (NSManagedObjectContext *)managedObjectContext { if (_managedObjectContext != nil) { return _managedObjectContext; } NSPersistentStoreCoordinator *coordinator = [self persistentStoreCoordinator]; if (coordinator != nil) { _managedObjectContext = [[NSManagedObjectContext alloc] init]; [_managedObjectContext setPersistentStoreCoordinator:coordinator]; } return _managedObjectContext; } // Returns the managed object model for the application. // If the model doesn't already exist, it is created from the application's model. - (NSManagedObjectModel *)managedObjectModel { if (_managedObjectModel != nil) { return _managedObjectModel; } NSURL *modelURL = [[NSBundle mainBundle] URLForResource:@"CoreData" withExtension:@"momd"]; _managedObjectModel = [[NSManagedObjectModel alloc] initWithContentsOfURL:modelURL]; return _managedObjectModel; } // Returns the persistent store coordinator for the application. // If the coordinator doesn't already exist, it is created and the application's store added to it. - (NSPersistentStoreCoordinator *)persistentStoreCoordinator { if (_persistentStoreCoordinator != nil) { return _persistentStoreCoordinator; } NSURL *storeURL = [[self applicationDocumentsDirectory] URLByAppendingPathComponent:@"DBUCoreData.sqlite"]; NSError *error = nil; _persistentStoreCoordinator = [[NSPersistentStoreCoordinator alloc] initWithManagedObjectModel:[self managedObjectModel]]; if (![_persistentStoreCoordinator addPersistentStoreWithType:NSSQLiteStoreType configuration:nil URL:storeURL options:nil error:&error]) { /* Replace this implementation with code to handle the error appropriately. abort() causes the application to generate a crash log and terminate. You should not use this function in a shipping application, although it may be useful during development. Typical reasons for an error here include: * The persistent store is not accessible; * The schema for the persistent store is incompatible with current managed object model. Check the error message to determine what the actual problem was. If the persistent store is not accessible, there is typically something wrong with the file path. Often, a file URL is pointing into the application's resources directory instead of a writeable directory. If you encounter schema incompatibility errors during development, you can reduce their frequency by: * Simply deleting the existing store: [[NSFileManager defaultManager] removeItemAtURL:storeURL error:nil] * Performing automatic lightweight migration by passing the following dictionary as the options parameter: @{NSMigratePersistentStoresAutomaticallyOption:@YES, NSInferMappingModelAutomaticallyOption:@YES} Lightweight migration will only work for a limited set of schema changes; consult "Core Data Model Versioning and Data Migration Programming Guide" for details. */ NSLog(@"Unresolved error %@, %@", error, [error userInfo]); abort(); } return _persistentStoreCoordinator; } #pragma mark - Application's Documents directory // Returns the URL to the application's Documents directory. - (NSURL *)applicationDocumentsDirectory { return [[[NSFileManager defaultManager] URLsForDirectory:NSDocumentDirectory inDomains:NSUserDomainMask] lastObject]; }
5. 사용하기.
Data Model을 추가하고, Entity를 설정한 다음 사용할 수 있습니다.자세한 내용은 블로그([iOS] CoreData를 이용하여 데이터를 저장하자.)를 참고하여 주세요.
피드 구독하기:
글 (Atom)