모든 UIKit에 물리적 성질을 추가 할 수 있는 것이 iOS7의 Dynamics 입니다.
그것을 이용해서, 초기 화면의 UILabel 들에 Dynamics를 적용해 보도록 하겠습니다.
이전에는 UIView Animation을 이용해서 하던 것을 Dynamics를 활용해서 만드는 것입니다.
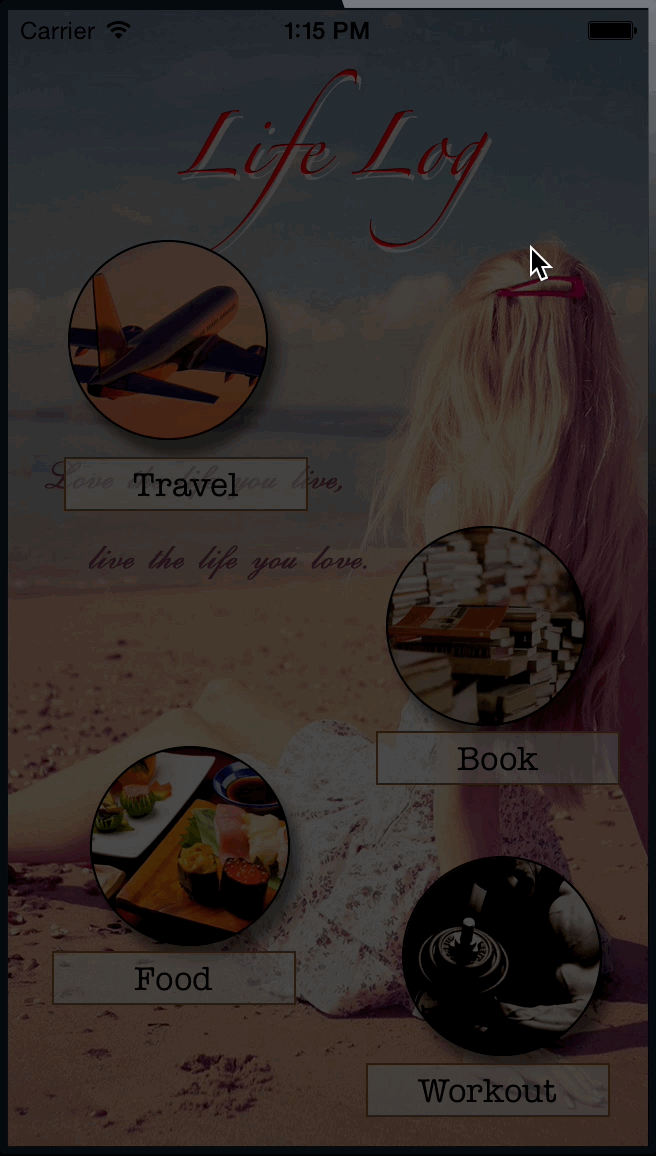
버튼 밑에 설명 Label을 붙이고, 이 Label들이 모션에 의해서 흔들리도록 해보겠습니다.
아래에 사용된 이미지는 구글 이미지에서 찾은 것들로, 저작권은 전혀 저에게 있지 않습니다.( 원본은 아래에 링크를 넣었습니다.)

각 컨트롤에 대해서, Property 연결 합니다.
source code
@property (strong, nonatomic) IBOutlet UIImageView *travelImageView;
@property (strong, nonatomic) IBOutlet UIImageView *bookImageView;
@property (strong, nonatomic) IBOutlet UIImageView *workoutImageView;
@property (strong, nonatomic) IBOutlet UIImageView *foodImageView;

@property (strong, nonatomic) IBOutlet UILabel *travelLogLabel;
@property (strong, nonatomic) IBOutlet UILabel *bookLogLabel;
@property (strong, nonatomic) IBOutlet UILabel *foodLogLabel;
@property (strong, nonatomic) IBOutlet UILabel *workoutLogLabel;


@property (strong, nonatomic) UIDynamicAnimator *animator;
@property (strong, nonatomic) UIGravityBehavior *gravityBehavior;
@property (strong, nonatomic) UICollisionBehavior *collisionBehavior;
@property (strong, nonatomic) UIPushBehavior *pushBehavior;
그리고, UIDynamicsAnimator, UIGravityBehavior 로 설정합니다.
- (void) setupDynamics
{
    self.animator = [[UIDynamicAnimator alloc] initWithReferenceView:self.view];
    self.gravityBehavior = [[UIGravityBehavior alloc] initWithItems:@[self.travelLogLabel, self.bookLogLabel, self.foodLogLabel, self.workoutLogLabel]];
    [self.animator addBehavior:self.gravityBehavior];
    ...
}
각 UILabel에 대해서 UIAttachmentBehavior를 연결하고, Damping과 Frequency를 설정합니다.
#pragma mark - Dynamics Setting
- (void) setupDynamics
{
    ...

    //Label들에 대해서, 마찰저항을 설정하고, 회전하지 않도록 설정
    UIDynamicItemBehavior *labelItemBehavior = [[UIDynamicItemBehavior alloc] initWithItems:@[self.travelLogLabel, self.bookLogLabel, self.foodLogLabel, self.workoutLogLabel]];
    labelItemBehavior.resistance = 1.0f;
    labelItemBehavior.allowsRotation = NO;
    [self.animator addBehavior:labelItemBehavior];

    // Travel Label에 대해서 AttchmentBehavior를 연결함.
    [self addAttachmentBehavior:self.travelLogLabel
                        atPoint:CGPointMake(self.travelImageView.center.x, self.travelImageView.center.y)
                     toAnimator:self.animator];

    // Book Label에 대해서 AttachmentBehavior를 연결
    [self addAttachmentBehavior:self.bookLogLabel
                        atPoint:CGPointMake(self.bookImageView.center.x, self.bookImageView.center.y )
                     toAnimator:self.animator];

    // Food Label에 대해서 AttachmentBehavior 연결
    [self addAttachmentBehavior:self.foodLogLabel
                        atPoint:CGPointMake(self.foodImageView.center.x, self.foodImageView.center.y )
                     toAnimator:self.animator];

    // Workout Label에 대해서 AttachmentBehavior 연결
    [self addAttachmentBehavior:self.workoutLogLabel
                        atPoint:CGPointMake(self.workoutImageView.center.x, self.workoutImageView.center.y )
                     toAnimator:self.animator];

    ....
}
- (void) addAttachmentBehavior:(UILabel *)label atPoint:(CGPoint)point toAnimator:(UIDynamicAnimator *)animator
{
    UIAttachmentBehavior *attachment = [[UIAttachmentBehavior alloc] initWithItem:label attachedToAnchor:point];
    attachment.damping = 1.0f;
    attachment.frequency = 100.0f;
    [animator addBehavior:attachment];
}
이 두 값을 설정하더라도 적절하게 멈추는 것이 아니라, 자주 흔들리게 됩니다.
아래의 왼쪽이 Attachment만 적용한 것이고, 오른쪽이 UIDynamicItemBehavior로 마찰저항을 추가한 것입니다.

이제, CoreMotion을 추가해서, 기기가 좌우로 흔들릴 때 마다, PushBehavior를 추가하여, Label이 흔들리도록 하겠습니다.
먼저 CoreMotion을 추가합니다.
@import CoreMotion;
...
- (void)viewDidLoad
{
    [super viewDidLoad];
	// Do any additional setup after loading the view, typically from a nib.

    _motionManager = [[CMMotionManager alloc] init];
    [self startMonitoringAcceleration];
}
...

#pragma mark - Dynamics Setting
- (void) setupDynamics
{
    ...

    self.pushBehavior = [[UIPushBehavior alloc] initWithItems:@[self.travelLogLabel, self.bookLogLabel, self.foodLogLabel, self.workoutLogLabel] mode:UIPushBehaviorModeInstantaneous]; //Instantaneous로 설정
    self.pushBehavior.active = NO;
    float angle = arc4random() % 360;
    self.pushBehavior.angle = (angle*M_PI/180.0);
    self.pushBehavior.magnitude = 0.4f;
    [self.animator addBehavior:self.pushBehavior];
}
#pragma mark - CoreMotion
- (void)startMonitoringAcceleration
{
    if (_motionManager.accelerometerAvailable) {
        //[_motionManager startAccelerometerUpdates];
        NSLog(@"accelerometer updates on...");
        [_motionManager setAccelerometerUpdateInterval:0.1f];
        [_motionManager startAccelerometerUpdatesToQueue:[NSOperationQueue mainQueue]
                                             withHandler:^(CMAccelerometerData *accelerometerData, NSError *error) {
                                                 float angle = atan2f(-accelerometerData.acceleration.y, accelerometerData.acceleration.x);
                                                 //NSLog(@"accelerometer:angle:%2.02f, x:%.02f, y:%.02f, z:%.02f", 180.0+angle*180.0/M_PI, accelerometerData.acceleration.x, accelerometerData.acceleration.y, accelerometerData.acceleration.z);

                                                 NSLog(@"angle: %0.2f, %02.2f", angle, angle / M_PI * 180.0);
                                                 if (angle > 100*M_PI/180.0) {
                                                     angle = 100*M_PI/180.0;
                                                 }
                                                 if(angle < 80*M_PI/180.0){
                                                     angle = 80*M_PI/180.0;
                                                 }
                                                 self.gravityBehavior.angle = angle;// - 180.0 * M_PI / 180.0;
                                             }
         ];
    }else{
        NSLog(@"accelerometer Unavailable");
    }
}


- (void)stopMonitoringAcceleration
{
    if (_motionManager.accelerometerAvailable && _motionManager.accelerometerActive) {
        [_motionManager stopAccelerometerUpdates];
        NSLog(@"accelerometer updates off...");
    }
}
@end
위에서, accelerometerData의 acceleration의 x,y 좌표 값을 가지고, Angle을 구하고, 그것을 바탕으로 PushBehavior의 Active를 YES로 입력합니다.
실제 Device에서 실행을 하면, 회전을 살짝하면, Label 들이 움직이게 됩니다.
[이미지 출처]
배경화면, 비행기, 책, 음식, 운동
참고 :
- WWDC 2013 : Getting started with UIKit Dynamics
: #206 세션으로, 다이나믹스에 대한 설명이 있음.
- UIKit Dynamics and iOS 7: Building UIKit Pong
: 다이나믹스를 이용해서, 바운싱을 예제로 설명하고 있는 곳.
- RayWenderlich의 UIKit Dynamics 강좌
0 comments:
댓글 쓰기